Inspect container images with dive
Container images can be created using docker build with a Dockerfile, or with other tools such as jib or pack. Regardless of which tool was used to create the container image, you can use dive to inspect all layers that make up the final image.
Container image and container image layer
A container image is a read-only, immutable file that contains the source code, libraries, dependencies, environment configuration, tools, and other files needed for an application to run. It has a human-readable name, a human-assigned tag, and can be used to create containers.
A container image layer is basically just an intermediate container image that has neither a name, nor a tag. You can think of a container image just as a diff of several container image layers.
The Open Container Initiative (OCI) came up with a specification for a standard format for container images. This means that you can use any tool to create a container image, as long as such tool produces a container image that adheres to the OCI specification.
Dive vs other tools
If you are just interested in knowing what’s inside a container—which, remember, was built using a container image, i.e. the final container image layer—you can enter the container and have a look around.
For example, let’s say that you want to know what’s inside an Alpine Linux container.
First, you pull the container image from a container registry like Docker Hub:
docker pull alpine:latestSecond, you create a container and obtain a shell:
docker run --rm --interactive --tty alpine:latest
# or, for short
docker run --rm -it alpine:latest
Third, inside the Alpine container, you list all the files:
ls -1aRBut what if want to know how many layers there are, and how big they are? Well, for that there is docker history.
docker history alpine:latestHowever, as far as I know, there is only one tool that allows you to inspect each layer that make up the final image, and that tool is dive.
Installation
You can obtain dive by downloading and installing the binary from its GitHub releases, or by pulling its container image with docker pull wagoodman/dive:latest.
How to use dive? A few examples
Example 1: Alpine Linux
If you don’t have a local Alpine image, you can pull the latest one from Docker Hub with this command:
docker pull alpine:latestYou are now ready to inspect the container image layers with dive:
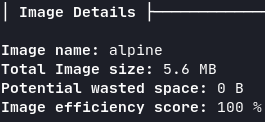
dive alpine:latestYou can switch panes with Tab, collapse/expand the file tree with the space bar, and exit the program with Ctrl+c.
You can read the documentation for the other keybindings.
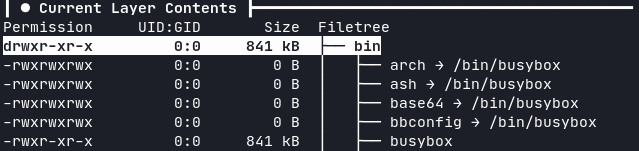
Alpine is a Linux distro designed to be used in containers and embedded devices. Two of the main reasons of its small size (~5MB) are that Alpine packs 300+ UNIX tools in a single binary, thanks to BusyBox, and decided to pick musl as the implementation for the standard C library (see here how musl compares with glibc).
Using dive you can see that the “binaries” in Alpine are just symlinks to the single binary /bin/busybox.
If you are curious you can also inspect the container image of BusyBox (or Toybox, an alternative to BusyBox) and see how small it is. I’ll leave you the commands here so you can copy and paste them.
docker pull busybox:latest
dive busybox:latest
docker pull tianon/toybox:latest
dive tianon/toybox:latestExample 2: JDK vs JRE in a Clojure app
If you are developing a Java/Clojure/Kotlin/Scala application (or any language which compiles to Java bytecode and runs on the Java Virtual Machine), you need the Java Development Kit (JDK). However, once that application is compiled and packaged into an uberjar, it can be run either with the JDK or with the Java Runtime Environment (JRE).
There are many ways to create a container image which can run an uberjar. I like to use pack. With pack you don’t need a Dockerfile to create a container image. You simply specify a path to your source code, a builder, and let the builder build the container image for you.
I had a Clojure application and I decided to use pack and the Paketo Tiny Builder to create a container image. This is the command I used:
pack build my_clojure_app:latest \
--path . \
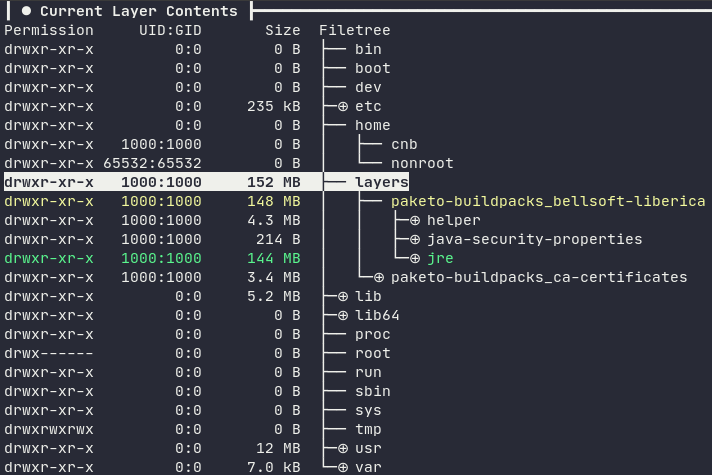
--builder paketobuildpacks/builder:tinyThe generated container image is roughly 180 MB, mostly due to the layer containing the Java Runtime Environment (JRE), which is 148 MB.
You don’t really need to know pack, builders and buildpacks to understand this example. The only thing you need to know is that a builder is itself a container image, and can be configured with environment variables at build-time. These environment variables control the buildpacks used by the builder.
Two of the buildpacks used by Paketo Tiny Builder are Paketo BellSoft Liberica Buildpack and the Paketo Clojure Tools Buildpack, and can be configured with many environment variables. The most important one is BP_JVM_TYPE, which controls whether the container image will contain the JDK or the JRE (the default).
You can generate a container image containing the JDK (instead of the JRE) with this command:
pack build my_clojure_app:latest \
--path . \
--builder paketobuildpacks/builder:tiny \
--env BP_JVM_TYPE=JDK \
--env BP_JVM_VERSION=11 \
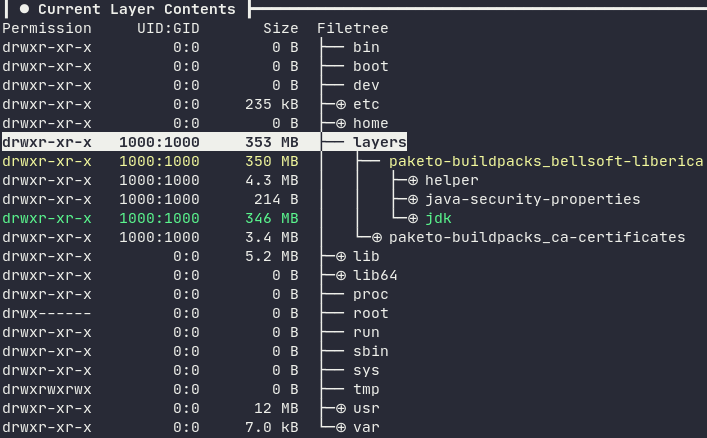
--env BP_CLJ_TOOLS_BUILD_ARGUMENTS="-T:build uber"The layer containing the Java Development Kit (JDK) is 350 MB, more than double the size of the layer containing the JRE (148 MB).
Example 3: Node.js Express app
I have a simple Express app which I use to receive and handle webhook events from Stripe. The app is written in TypeScript and bundled with esbuild. I compile the TS and generate the bundle.js on my laptop, and let the builder gcr.io/buildpacks/builder:v1 build the container image (which I then deploy to Cloud Run). Here is the command I use to create the container image:
pack build my_nodejs_app:latest \
  --path ./dist \
--builder gcr.io/buildpacks/builder:v1Note: dist/ contains bundle.js and package.json
Using dive we can see that the container image layer corresponding to the Node.js runtime is called google.nodejs.runtime. It’s roughly 101 MB in size and contains the node binary (75 MB) and two symlinks for npm and npx.
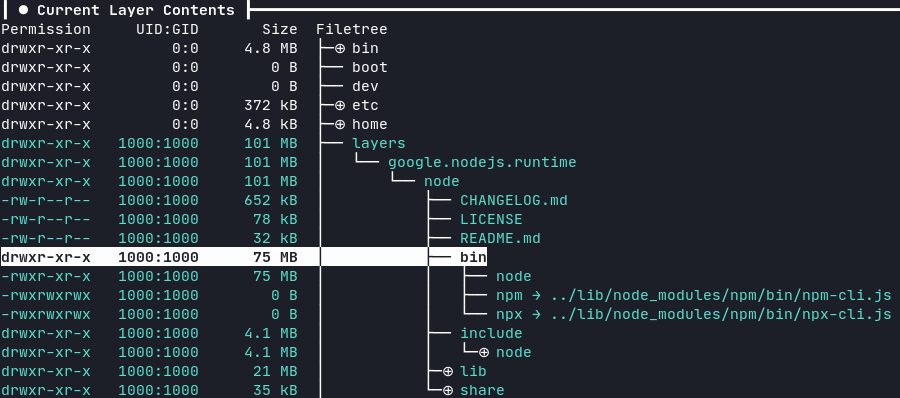
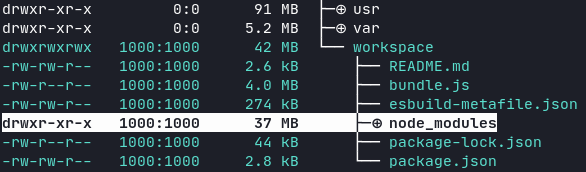
The container image layer corresponding to the Express app is 42 MB, mostly due to its dependencies in node_modules (37 MB).
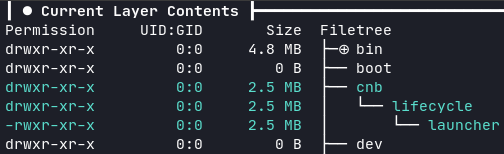
Another layer is the Cloud Native Buildpack launcher. Here cnb is the non-root user that executes the commands in the container.
The second-to-last layer contains the configuration metadata.toml of the buildpack.

The last layer is just a symlink for the buildpack launcher.
